Seasonal decorations should be easy to make, utilize a little bit of Mother Nature, and easy to switch – because the holidays are one on top of the other. When it comes to decorating your RV for any holiday, it’s important to use materials that aren’t fragile, and can be used year to year or recycled once that holiday is over. However, if you love your creation, you can use it at your sticks and bricks home, too.
To spruce up the inside and outside of your RV in celebration of the gorgeous colors, sights, and smells of autumn, we have found some fantastic DIY fall decorations… all thanks to Pinterest (where we have several boards, FYI) and other crafty sources. It’s fun to create, and fun is a good thing right now.
Brian Woodcock photo
Welcome Note
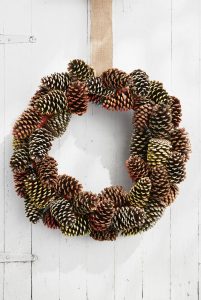
The traditional of a wreath hanging from the front door goes back thousands of years, and means different things to different cultures. In America, a wreath is a very homey accent that immediately makes visitors feel welcome. This easy-to-make wreath from Country Living utilizes a material you can easily find in nature: pinecones. Mix varieties or choose one type.
Crafting Instructions
- Wrap a 16-inch wreath form with burlap ribbon and loop a piece around the wreath form for hanging.
- Paint the tip of 40 pine cones in fall colors such as orange, yellow, and beige with acrylic paint. Brush the tips of 10 pine cones with matte Mod Podge and sprinkle with gold and copper glitter.
- Once dry, wrap an 18-inch length of floral wire around the base of each pine cone and twist tie around the wreath form to secure, layering and overlapping them as you go.
 Tabletop Party
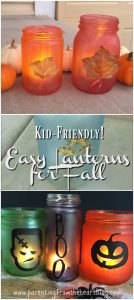
If you want to host a fall gathering outdoors, or even a small family party indoors, then “go through all the trouble” of making some beautiful centerpieces. These fall lanterns from Parenting from the Heart are just the ticket. All you need are mason jars (glass is best but plastic is fine), flameless tea lights, dried leaves, flowers, or sticks, paint brushes, and food coloring. This is a craft kids will enjoy doing, too. Place a large square of quilting material or a white doily underneath for an added touch.
Crafting Instructions
- Take roughly a tablespoon of Elmer’s glue and it mix with a couple of drops of red and yellow food coloring. Once you’ve reached your desired color, paint the jars completely all over.
- Once the paint has dried, use a small dab of glue to affix your embellishment whether it be a leaf, flower, or similar.
- Let dry and then set a flameless candle inside.
- If you would like your lanterns to be waterproof, you must spray them with varnish or lacquer before setting outside. To do so, go into a well-vented area away from children, follow the instructions on the can and let completely dry.
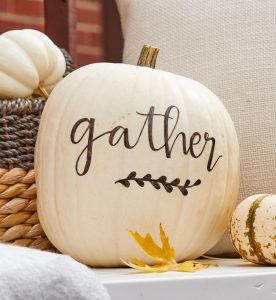
Photo: Better Homes and Gardens
Outdoor Display
Pumpkins are an essential decoration to have on a porch or leading up at the entryway – and they aren’t just for carving. Stop at a local farm or orchard to pick up some pumpkins. Vary the sizes, colors, and shapes. White pumpkins can really make a statement and make a perfect backdrop for this simple craft from Better Homes and Gardens. All you need is a permanent marker to transfer stencils onto the pumpkins. Use a mix of fall stencils such as leaves, harvest, and thanksgiving well-wishes. Download their free “gather” pattern to use as one of your stencils.
Scatter stenciled and clean-front pumpkins on hay bales and hang some festive lanterns, and you’ve got a showstopping display that will make everyone smile when they go by.
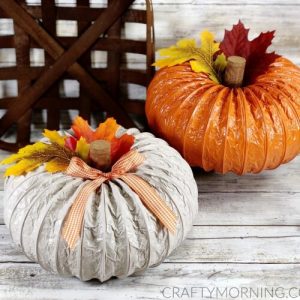
Photo: Crafty Morning
Fun with Fall
As if real pumpkins aren’t enough, make your own pumpkins using dryer vent duct via these instructions from Crafty Morning and show them off around the inside of the RV, or give them as neighborly gifts. This fall craft is a little more involved, but they’re decorations that can be used year to year.
Crafting Materials
- Flexible Aluminum Dryer Vent Duct4 inch wide inside
- Rust-oleum Spray Paint & PrimerI used Rustic Orange and Smokey Beige colors
- Ribbon
- Wine cork
- Hot glue gun
- Fake fall colored leaves
- Wire cutter
Crafting Instructions
- Stretch out the dryer vent duct and measure 24 inches (2 feet). Take a scissors and cut around through it. You will probably need a wire cutter to get it completely off.
- Fold the ends inside on each end.
- Wrap the dryer vent duct into a circle and hot glue the edges. Hold for 30 seconds. (I found it was easier gluing the bottom part first then the second half.)
- On a piece of cardboard, spray paint the duct outside and let dry. You will need to spray the top and let dry before you flip and do the bottom.
- Hot glue on some fall leaves and a wine cork for the pumpkin stem.
- Tie a bow with a ribbon and hot glue it on.
- Time to display your pumpkins!