
Summer is winding down and kids are returning to school in a few short weeks. Now is the time to make those dishes you’ve been meaning to make all summer – and this article may complicate things, because you may not be able to resist adding them to the list. Leave your worries in your phone and turn your attention to whipping up these dishes for you and your family.
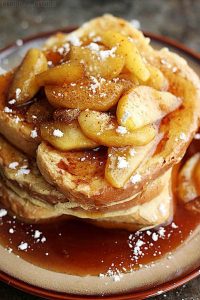 Breakfast: Camping French Toast with Apples – Fresh off the Grid
Dubbed the “most important meal of the day,” this delectable breakfast will launch kids out of bed and fill their hungry tummies – and keep them full. Add the apple topping, using Michigan apples of course, for some extra intrigue and a boost of flavor.
Ingredients
- 1/2 loaf of your favorite bread (pre-sliced bread is too thin)
- 3 eggs
- 1 cup milk
- 2 Tablespoons sugar
- 1 teaspoon cinnamon
- 1 teaspoon vanilla extract (optional)
- ¼ teaspoon nutmeg (optional)
- 4 Tablespoons butter for pan
- Apple topping (see below)
- Maple syrup
Instructions (Apple Topping)
- Add apple slices from 2 medium apples, ¾ cup of brown sugar, and 4 Tablespoons of butter in a medium saucepan. Cook over medium high heat until brown sugar has dissolved, and butter has melted.
- Add 1/4 teaspoon vanilla and 1/2 teaspoon cinnamon and reduce heat to simmer. Cook 6-8 minutes longer.
- Remove from heat and allow to cool slightly and thicken while you prepare toast.
Instructions (French toast)
- Cut the bread into 3/4″ – 1” thick slices.
- Beat the eggs first in a bowl large enough to accommodate a slice of the bread. Then add milk, cinnamon, nutmeg, vanilla, and sugar together, until thoroughly mixed.
- Heat 4 tablespoon butter in a skillet over medium heat.
- Dip a slice of bread in the egg and milk mixture and let it soak for about 10 seconds on each side. Let the excess drip off, sprinkle each side with additional sugar, and then fry it in the skillet until golden and crispy on each side, about 3 minutes per side.
- Repeat with the rest of the bread, adding more butter to the skillet as needed.
- Serve with maple syrup and your favorite toppings.
Lunch: Pie Iron Pizza Calzone – Beyond the Tent
What child – or adult for that matter – doesn’t love pizza? With pie irons, everyone can choose their own ingredients to make personal calzones. Just like s’mores, a well-cooked calzone requires patience and frequent flipping or turning. In just 5-10 minutes, lunch is ready to serve.
Ingredients
- Pre-Made Pizza Crust Dough (I used Pillsbury Pizza Crust in a roll)
- Hunt’s Pizza Sauce
- Mozzarella Cheese
- Can of Diced Tomatoes
- Pepperoni
Instructions
- Start by lining your pie iron with a healthy dose of cooking spray to make sure you can get your calzone out of your iron when it’s done (we use olive oil for all of our cast iron pie irons).
- Line both sides of the pie iron with your pizza dough. Remember that the dough will rise quite a bit so make sure not to put it in too thick, I did about 1/8 thick or less and it rose perfectly.
- Place all of your ingredients on only one side of the iron such as the sauce, pepperonis and cheese. Remember that you will have to place one side of the iron down onto the other side and you don’t want your food falling out.
- Lock up your pie iron and place over a low flame coal bed in your fire pit. I lay mine directly in the coals.
- Flip the iron often and even take it out of the coals for a few minutes to make sure you don’t develop hot spots in the pie iron and burn your crust.
- Cook for 5-10 minutes depending on your fire. Check often, after about 3-4 minutes you should be able to crack the iron open to check on the calzone. I like to cook mine to a golden brown like a marsh mellow.
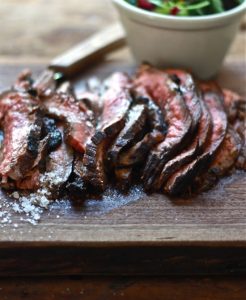 Dinner: Hawaiian Marinated Flank Steak – The Clever Carrot
The flavors of island life really come through in this easy-to-make recipe. Flank steak is a nice thin cut of meat that really picks up a lot of flavor with enough time to marinade. You can choose to cook the steak in a Dutch oven instead of a grill. Add some rice, maybe even some tortillas, crunchy cut peppers, and you’ve got a fantastic meal.
Ingredients
- 1 1/2– 2 lbs. good quality flank steak*
- 1 bottle Teriyaki marinade
- 1 cup pineapple juice
- 1 inch piece of ginger, sliced
- 2 large sprigs of rosemary
- olive oil
- salt & pepper
Instructions
- In a 9×13 baking dish, add 1/2 bottle of the marinade (save the rest for another use), pineapple juice, ginger, and rosemary. Whisk to combine. Add the steak, making sure that it is covered with the marinade. Add extra teriyaki and pineapple juice if necessary. Cover with plastic wrap and marinate in the fridge for at least 24 hours.
- Remove the steak from the refrigerator about 30 minutes prior to cooking. Taking the chill off helps the meat to cook evenly.
- Heat your grill to high. Remove the steak from the marinade and pat dry with paper towels. Drizzle lightly with olive oil and rub it in to coat (this prevents sticking on the grill). Season with salt and pepper and set aside.
- For the glaze, pour the remaining marinade into a small saucepan. Bring to a boil and then simmer until slightly thickened and reduced by half.
- Grill the steak for about 6-8 minutes on each side (medium-rare), brushing them with the glaze in between each turn. Increase cooking time depending on your temperature preference.
- Remove from the grill and let rest for at least 10 minutes so that all the juices can evenly distribute. Thinly slice on an angle and serve with desired side dishes.
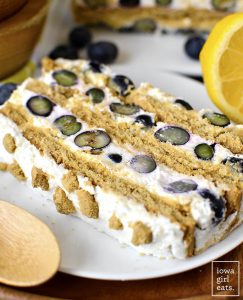 Dessert: Lemon Blueberry Icebox Cake – Iowa Girl Eats
This no-bake dessert is a perfect combination of sweetness and freshness. You will, however, need a refrigerator for the cake to set. Pick up some blueberries – or replace the blueberries with any favorite berry – from a u-pick or farmer’s roadside stand from the end of July and throughout August.
Ingredients (serves 8)
- 1-1/2 cups prepared lemon curd (see notes)
- 9 oz tub coconut whipped topping
- 2, 8 oz boxes gluten free graham crackers
- 1 pint blueberries
Instructions
- Add lemon curd and whipped topping to a large bowl then fold to combine.
- Line a 9×5” loaf pan with saran wrap, letting it hang generously over the ends. Spread/add layers as follows:
-
- 3/4 cup lemon mixture
- graham crackers, cut/broken to fit into an even layer
- 3/4 cup lemon mixture
- Scant cup blueberries
- 3/4 cup lemon mixture
- graham crackers
- 3/4 cup lemon mixture
- scant cup blueberries
- 3/4 cup lemon mixture
- graham crackers
- 3/4 cup lemon mixture
- scant cup blueberries
- any leftover lemon mixture (ok if none)
- Cover the top with saran wrap then refrigerate for at least 18 hours. When ready to serve, remove saran wrap from the top then invert cake onto a cutting board. Gently pull on overhanging saran wrap to remove the cake from the pan then sprinkle top with crushed leftover graham crackers, slice with a very sharp knife, and serve.