Tap into your creative side with these easy to make, fun Halloween decorations that are sure to add some spooky charm to your RV and around your campsite. Many of these items are budget friendly and can be found at a craft store or dollar store. Share your photos with us on Facebook and Instagram!
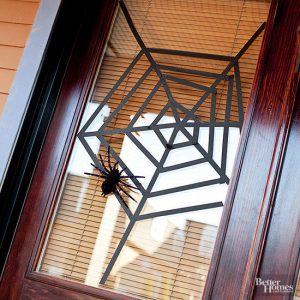 Webbed Door & Window Covering
Add a creative and unnerving embellishment to your RV’s entry door with this easy-to-make spider web, or have a spider web takeover by decorating all the windows, too!
Supplies:
- black craft tape
- faux spiders
- suction cups
Make the decoration:
- Start with three long strips of black crafts tape, creating an off-center X shape with two pieces and using the third to cut across the middle of the X, dividing your glass window into six sections.
- Starting at the center, add tape strips to each section until a web starts to take shape.
- Hot-glue a suction cup to a faux spider, and attach it to the window.
(image credit: Sabine Williams)
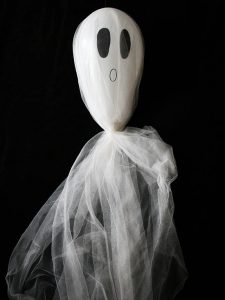
Balloon Ghost
This life-sized Halloween accessory is perfect for hanging from your RV’s awning and especially eerie on a windy Halloween night. Make a few and hang them from garden hooks around or leading up to your RV. It’s up to you whether you want them to be scary or friendly!
Supplies:
- White balloons
- permanent marker
- string
- white netting
Make the decoration:
- Blow up a white balloon and give your ghost a facial expression with a black permanent marker.
- Tape a piece of string to the top of the balloon and thread it through the middle of a sheet of netting; allow the netting to fall down around the sides of the balloon.
- Finish by pulling the netting tight beneath the balloon and tie with more string, then hang from the top-most string.
Tombstone
 No, not the old Western film. These wooden tombstones are lightweight and can be decorated with clever epitaphs, such as Ima Goner or C.U. Later. It’s a little more involved than other projects on this list, and you may need to make them at home instead of at the campground, but they’re fun and can be used year after year because of the durable material.
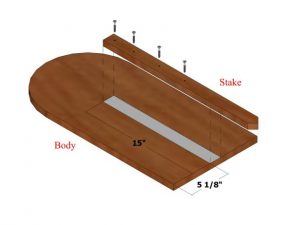
Project Cut List
Body – 3/4″ x 11-3/4″ x 23-3/4″
Stake – 3/4″ x 1-1/2″ x 21″
Step – 3/4″ x 3-1/2″ x 11-3/4″
1. Create the Body: Use the layout as a guide for marking and cutting the body to shape. To mark the rounded end of the body, use either a beam compass or a do-it-yourself compass. To make your own compass, grab a piece of scrap wood, paint stirrer, or a thin craft board. Cut it roughly 12 inches long. Mark a center line along the length of the board. Drive a 4d nail on a spot on the line near the end of the board. From the center of the nail, mark a line that matches the length of the radius you need to make – for this project it’s 5-7/8″. Drill a hole on that mark large enough for a pencil point to fit through the board. Drive the 4d nail into your radius distance mark on your project piece and draw the radius. Use a jigsaw to cut off the excess.
2. Attach the Stake and Step. Position the stake with the pointed end toward the bottom of the tombstone. The top of the stake should be 15 inches from the bottom and positioned halfway across the back of the tombstone. Attach using glue and 1-1/4″ deck screws. Don’t add screws all the way down as the step will need to be added. Position the step over top of the stake, running across the bottom, and attach using glue and 1-1/4″ pocket-hole screws.
3. Add Finishing Touches. Apply the desired finish. We used Valspar Stone finish spray paint (Manhattan Mist). Allow to dry. Use black paint to add details to the tombstone. When placing the tombstone in your yard, press on the step with your foot to drive the stake into the ground.
For step-by-step images, visit the DIY Network.
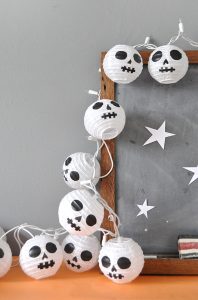 Paper Skulls
Create these simple paper lantern skulls and hang them from your RV’s awning! For this project, you will need only white paper lanterns, string lights, black tissue paper, Mod Podge, paintbrush and scissors. Invite the kids to decorate their own skulls for added variety. You can also use these festive lanterns to add some Halloween flare inside the RV, too.
Supplies
• 4″ white paper lanterns
• String lights
• Scissors
• Paintbrush
• Mod Podge
• Black tissue paper
Make the decoration:
- Cut two circles for eyes out of black tissue paper (they don’t have to be perfectly round).
- Cut out an upside-down heart for the nose; for the mouth, cut a 1 1/4″ long strip and three 3/8″ strips.
- Apply Mod Podge onto the paper lantern where you’d like the eyes to go; place the tissue-paper eyes on top and apply more Mod Podge on top to seal.
- Repeat step 3 for the nose and mouth.
- Let dry and repeat!
- Attach the finished lanterns onto the string lights or tie onto string to make a garland.