
Enjoying a meal, whether it’s beside a fire, at the picnic table, on a blanket at the beach, or inside at the dining room table, is one of the best parts of camping and RVing. You can bake a lot of the same things as you bake at home, and since February is “Bake for Family Fun” month, you can give these recipes a try with your young chefs.
Kids love to help plan meals, assemble and add ingredients, and mix things together. They like to take a look at the (and taste!) the food once it’s done baking to see how it turned out. Older kids can tend a fire or cook on the stovetop, but of course, as the parent, use your best judgement. Just make sure to have a good time together!
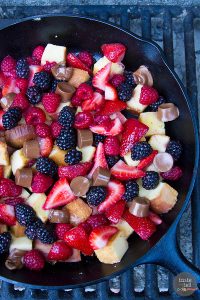 Pound Cake and Berry Campfire Skillet – From Taste & Tell
A twist on the traditional pound cake, this easy-to-make dessert requires only a little bit of prep and a little time over the coals in a cast iron skillet. The combination of warm, tangy fruit with the richness of the pound cake and sticky, melted Rolo bars is a delight on a cool night – and a hit with kids.
Ingredients
- 12–16 oz. fresh berries (about 4 cups)
- 2 tablespoons sugar
- 1/4 cup butter
- 3/4 lb pound cake (you can use a whole pound)
- 2 Rolo candy bars
Instructions
- Combine the berries and the sugar in a bowl and let sit until the juices start to release, 10-15 minutes.
- Place a grate over hot coals (or you can use a grill). Add the butter to a 12” cast iron skillet and allow to melt. Cut the pound cake into 1” cubes. Add to the hot skillet and cook, turning often, until all sides are toasted. Remove the skillet from the heat.
- Sprinkle the berries over the top of the cake cubes, then sprinkle the Rolos over the top. Cover the skillet with foil and allow to sit until the berries are warm and the chocolate is melting, 5-10 minutes.
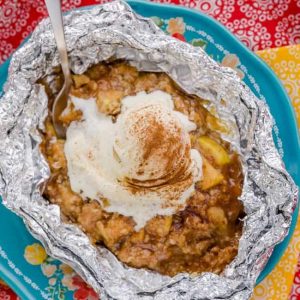 Campfire Apple Pie Packets – From Love from the Oven
Who doesn’t love the duet of apples and cinnamon? The foil conveniently contains the mess and provides a handy dish from which to enjoy the dessert straight out of the oven or off the grill. Kids will enjoy making the topping. Your neighbors will be lured in by the tantalizing smell.
Ingredients
APPLE MIXTURE
- 2 medium to large sized apples diced into approximately 1/4″ pieces
- 2 tsp lemon juice
- 2 tsp cornstarch
- 2 tbsp granulated sugar
- 1/4 cup packed brown sugar
- 1 tbsp cold butter cut into small pieces, approximately 1/8″
- 1 1/2 tsp cinnamon
TOPPING MIXTURE
- 1/4 cup quick cook oats old fashioned oats will also work, they just have a chewier texture
- 1/4 cup all-purpose flour
- 1/4 cup packed brown sugar
- 1 1/2 tsp cinnamon
- 1/4 cup cold butter cut into small pieces, approximately 1/8″
Instructions
- Preheat grill to medium heat or preheat oven to 450 degrees.
- Prepare four pieces of non-stick foil, approximately 12×18″ in size.
- In a medium sized bowl, combine diced apples and lemon juice. Add in cornstarch, sugars, cinnamon and butter. Mix to combine well. Set aside.
- Next, in a separate bowl, combine oats, flour, brown sugar and cinnamon. Mix well.
- Add butter to mixture and cut in with a pastry cutter or two forks.
- Place half of the apple mixture onto the center of one of the pieces of non-stick foil, making sure the mixture is touching the non-stick side. Sprinkle half of the crumb mixture over the apples.
- Seal foil packet tightly, making sure all sides are securely closed. Repeat with a second piece of foil. Repeat with remaining ingredients.
- Place on grill or over campfire for approximately 8-12 minutes, or place on a cookie sheet and bake in oven for approximately 15 minutes. Times are approximate as grill and campfire heating is harder to regulate than an oven.
- Remove from heat and allow to cool for approximately 10 minutes. Carefully open foil packets as they will be very hot. Top with a scoop of ice cream, serve, share, and enjoy.
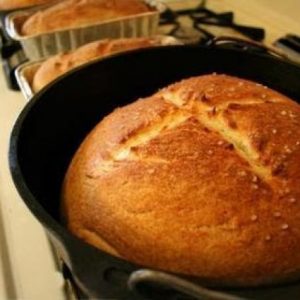 No-Knead Bread or Camp Fire Bread – From Key Ingredient
Does baking bread seem difficult or time-consuming? The hardest part about this no-knead bread recipe is keeping yourself from cutting a slice off immediately. This recipe is relatively hands free. The Dutch oven does all the work, leaving you with a peasant loaf that’s crusty on the outside and soft on the inside – just as bread should be. It’s a great addition to the dinner table and as a breakfast toast. Just a tip: you may want to make more than one.
INGREDIENTS
- 3 cups flour
- 1/2 teaspoon yeast
- 1 3/4 teaspoon salt
- 1 1/2 cups water
Instructions
- Mix 4 ingredients till combined. Coverwith foil and let sit in a warm place for 12 – 18 hours.
- Preheat oven to 450 degrees when ready to bake. Place cast iron pot in the oven to warm for 30 minutes.
- While the pot is warming, dump your dough out onto a heavily floured surface. While it has been sitting, it has been turning into a wet, bubbly goo. So dump it out and dust it with flour. Turn it over a couple times just so it forms into a ball. Cover with a towel and let sit for up to 2 hours, or until your pot is heated. Then place the ball of dough into the pot.
- Cover with lid and bake at 450 degrees for 30 minutes. Remove lid and bake for an additional 15 minutes. The bread should sound hollow when tapped.
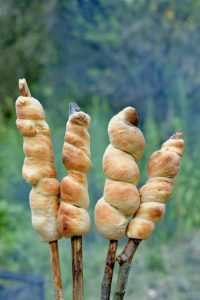 Sweet Stick Bread – Recipe courtesy of Carrie and Rupert Blease
Marshmallows and hot dogs get all the glory for food that can be cooked or baked on a stick, but this sweet stick bread will become a new family favorite. There isn’t much mess and you get to enjoy the finished product right away, as recommended.
Ingredients
- 2 1/2 cups flour
- 2 teaspoon baking powder
- 1/2 teaspoon salt
- 2 tablespoons milk powder
- 1 teaspoon sugar or honey
- 4 tablespoons extra virgin olive oil
- 1 cup water
Instructions
- Mix all dry ingredients together in a Ziploc.
- Add all wet ingredients to the bag, seal, and mix as thoroughly as possible.
- Empty bag onto a plate, and knead the dough for about five minutes, until completely incorporated and the dough is smooth and shiny.
- Cover and let rest for 30 minutes. While you wait, find a long stick, scrape the end to remove the outside bark, and soak this end in water. Once your campfire is roaring, place the soaked end of the stick into the fire to get it hot. This is one instance where you want to cook with flames, not hot coals.
- When your stick is hot, work a long, thin strip of dough around the end. Heating the stick first will help steam the inside of the bread.
- Place the dough end over the campfire and rotate occasionally to achieve an even golden-brown color on all sides. (The milk powder helps with caramelization.)
- Once your bread is ready, eat it immediately. You can dip the final product in fruit compote or sprinkle it with cinnamon sugar.